Have you ever photographed a sunset where the sky glows perfectly but the foreground falls into a black silhouette? Or shot a room with a bright window that blows out to pure white? Your camera’s light meter has to settle on a single exposure for the whole frame, and when a scene holds both deep shadows and blazing highlights, one shot simply cannot record everything. Exposure bracketing is the time-tested fix: instead of betting on a single exposure, you capture several at different brightness levels and keep — or blend — the best of each.
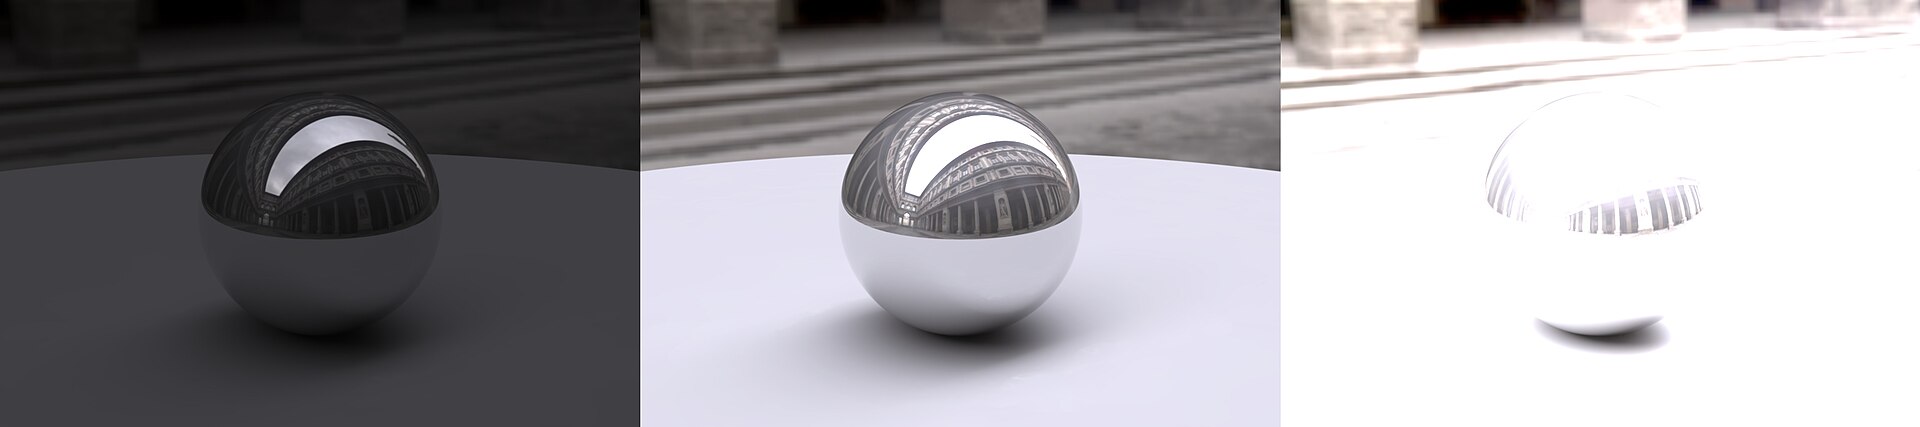
What Is Exposure Bracketing?
Exposure bracketing is the technique of shooting a series of near-identical photos of the same scene, each at a different exposure. The classic setup is three frames: one at the camera’s metered “correct” exposure, one underexposed to protect the highlights, and one overexposed to lift the shadows. The gap between frames is measured in stops (EV). A ±1 EV bracket is a common starting point, while ±2 EV is typical for high-contrast scenes, and most cameras let you fine-tune the step in 1/3-stop increments.
When the camera handles the sequence for you, it’s called Automatic Exposure Bracketing — AEB for short. You set the range, press the shutter, and the camera cycles through the exposures automatically, so you don’t have to recompose or re-meter between frames.
How Automatic Exposure Bracketing Works
AEB varies one exposure parameter while holding the others steady. On Canon’s EOS 5D Mark IV, for example, AEB brackets the exposure up to ±3 stops in 1/3-stop increments across three consecutive shots, adjusting shutter speed or aperture automatically. Which parameter changes depends on your shooting mode: in aperture-priority, the camera shifts shutter speed (keeping depth of field constant), while in shutter-priority it shifts aperture.
That distinction matters for merging. If you let the camera vary the aperture, your depth of field shifts subtly between frames, which can show up as soft or mismatched edges once you blend them. For the cleanest brackets, shoot in aperture-priority or manual and let shutter speed — or ISO — do the varying.
Some systems take the idea further. Fujifilm cameras, for instance, expose a whole family of bracketing modes through the drive dial: auto-exposure, ISO, film simulation, white balance, dynamic range, and even focus bracketing, which shifts the focus point across a burst. It’s the same core principle — capture a spread of settings so one is guaranteed to be right — applied to more than just brightness.
Why Photographers Bracket
Bracketing serves two big purposes: insurance and range.
As insurance, it protects you against metering mistakes in moments you cannot reshoot. Weddings, events, and fast-changing light are full of scenes where a single misjudged exposure means a lost shot. A three-frame bracket means one of them is almost certainly usable.
As range, bracketing is the foundation of high-dynamic-range (HDR) photography. Your sensor can only record so much contrast at once; by capturing an underexposed frame for the sky, an overexposed frame for the shadows, and a normal frame for the midtones, you can merge them into one image that shows detail everywhere — far more than any single RAW file could hold.
When to Use Bracketing (and When to Skip It)
Bracket when contrast is high: sunsets and sunrises, backlit portraits, interiors with bright windows, night cityscapes, and any landscape where a bright sky meets a dark foreground. Real-estate and architecture photographers bracket interiors almost by default.
Skip it when your subject moves. If anything in the frame is shifting between exposures — people, leaves, water, cars — the merged frames will not line up, producing the ghosted, doubled edges known as ghosting.
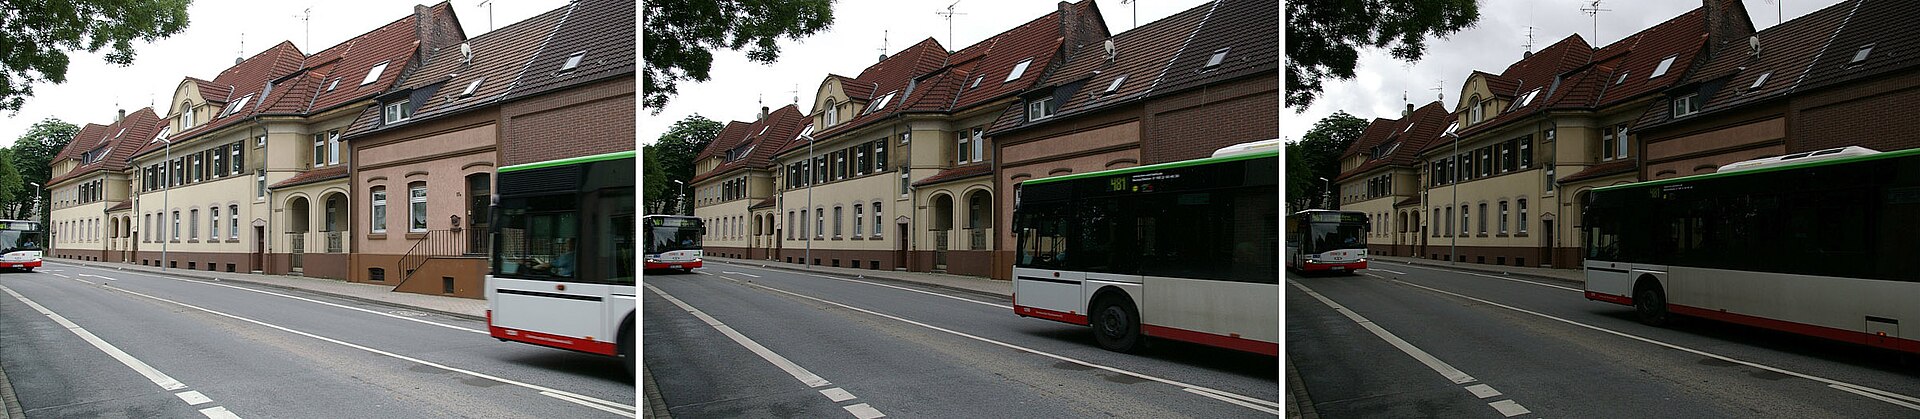
Bracketing a moving subject is one of the fastest ways to ruin an otherwise good scene, so for action you’re better off nailing a single exposure and recovering what you can in post.
How to Set Up AEB on Your Camera
The exact menu path varies by brand, but the flow is the same everywhere:
- Find the bracketing setting — usually labeled AEB, BKT, or “Exposure comp./AEB” in the menu, or on a drive-mode dial.
- Set the bracket range (for example, ±1 EV or ±2 EV) and the step size.
- Choose your drive mode — continuous shooting fires all frames with one shutter press; single-shot fires one frame per press.
- Mount the camera on a tripod if possible, focus once, and shoot.
One useful trick: most cameras let you combine AEB with exposure compensation, so you can bias the whole bracket brighter or darker while keeping the spread between frames.
Merging Brackets into HDR
Back at the computer, load your bracketed frames into any HDR merge tool. Lightroom’s Photo Merge > HDR and dedicated apps like Photomatix will auto-align the frames, blend them into a high-dynamic-range image, and let you dial in the look. For maximum control, many photographers skip automatic HDR and blend exposures by hand in Photoshop using layer masks — painting in the sky from one frame and the foreground from another. Whichever route you choose, the bracketed captures you made in the field are the raw material that makes it possible.
Conclusion
Exposure bracketing is one of the cheapest upgrades to your photography — it costs nothing, works on nearly every camera (and most smartphones), and quietly saves the day whenever the light refuses to cooperate. Set it to a modest ±1 EV, keep a tripod handy for the big merges, and you’ll stop losing highlights and shadows to a single guess. The next time a scene feels too contrasty for one shot, bracket it — your future self will thank you.
FAQ
How many bracketed shots do I need?
Three (at ±1 to ±2 EV) covers most scenes. For extreme contrast — say, direct sun through a dark interior — five to seven frames spread across a wider range give the merge more data to work with.
Do I need a tripod for exposure bracketing?
It’s strongly recommended. Handheld brackets can drift between frames, and while modern HDR software auto-aligns, a tripod keeps frames pixel-perfect and avoids soft merges — especially in low light.
Can I bracket exposure on a smartphone?
Yes. Many phone cameras expose an HDR or auto-bracketing mode, and manual camera apps let you shoot true exposure brackets for later merging on a desktop.
Related Posts
How to Read a Histogram: A Beginner’s Guide to Perfect Exposure
Your camera's histogram is one of its most useful tools…
Focal Length and Perspective Explained: What Your Lens Really Does
What Is Focal Length? Technically, focal length is the distance…
The Exposure Triangle: Aperture, Shutter Speed and ISO Explained
Every photograph you take is the result of one simple…