Exposure is the foundation of every photograph, and three settings decide how bright or dark your image turns out: aperture, shutter speed, and ISO. Of the three, ISO is the one beginners most often misunderstand. It is frequently described as a dial you “turn up when it’s dark,” but knowing what it actually does — and what it costs you — is the difference between a clean, crisp photo and a noisy, muddy one.
What Is ISO in Photography?
ISO expresses how sensitive your camera’s sensor is to light. The lower the number, the lower the sensitivity and the darker the image; the higher the number, the more the sensor amplifies the light it receives and the brighter the image. The name comes from the International Organization for Standardization, the body that publishes the technical standard for digital camera exposure index (ISO 12232).
In the film era, ISO (historically ASA in some markets) was a fixed property of the roll you loaded. If you shot ISO 400 film and the light changed, you either swapped rolls or lived with it. Digital cameras removed that limitation: you can change ISO shot to shot, which makes it a flexible, creative tool rather than a physical constraint.
How ISO Fits Into the Exposure Triangle
ISO works alongside aperture (how much light the lens lets through) and shutter speed (how long the sensor is exposed). While those two settings physically control the light reaching the sensor, ISO governs how the sensor interprets that light — a form of signal amplification, sometimes called gain.
ISO values double to represent a one-stop change in brightness: 100, 200, 400, 800, 1600, 3200, 6400, and so on. Moving from ISO 100 to ISO 200 brightens the image by one full stop, exactly as if you had doubled the exposure time or opened the aperture one stop. This is why, in manual mode, changing any one setting usually means adjusting one of the others to keep the same overall exposure.
ISO and Image Noise
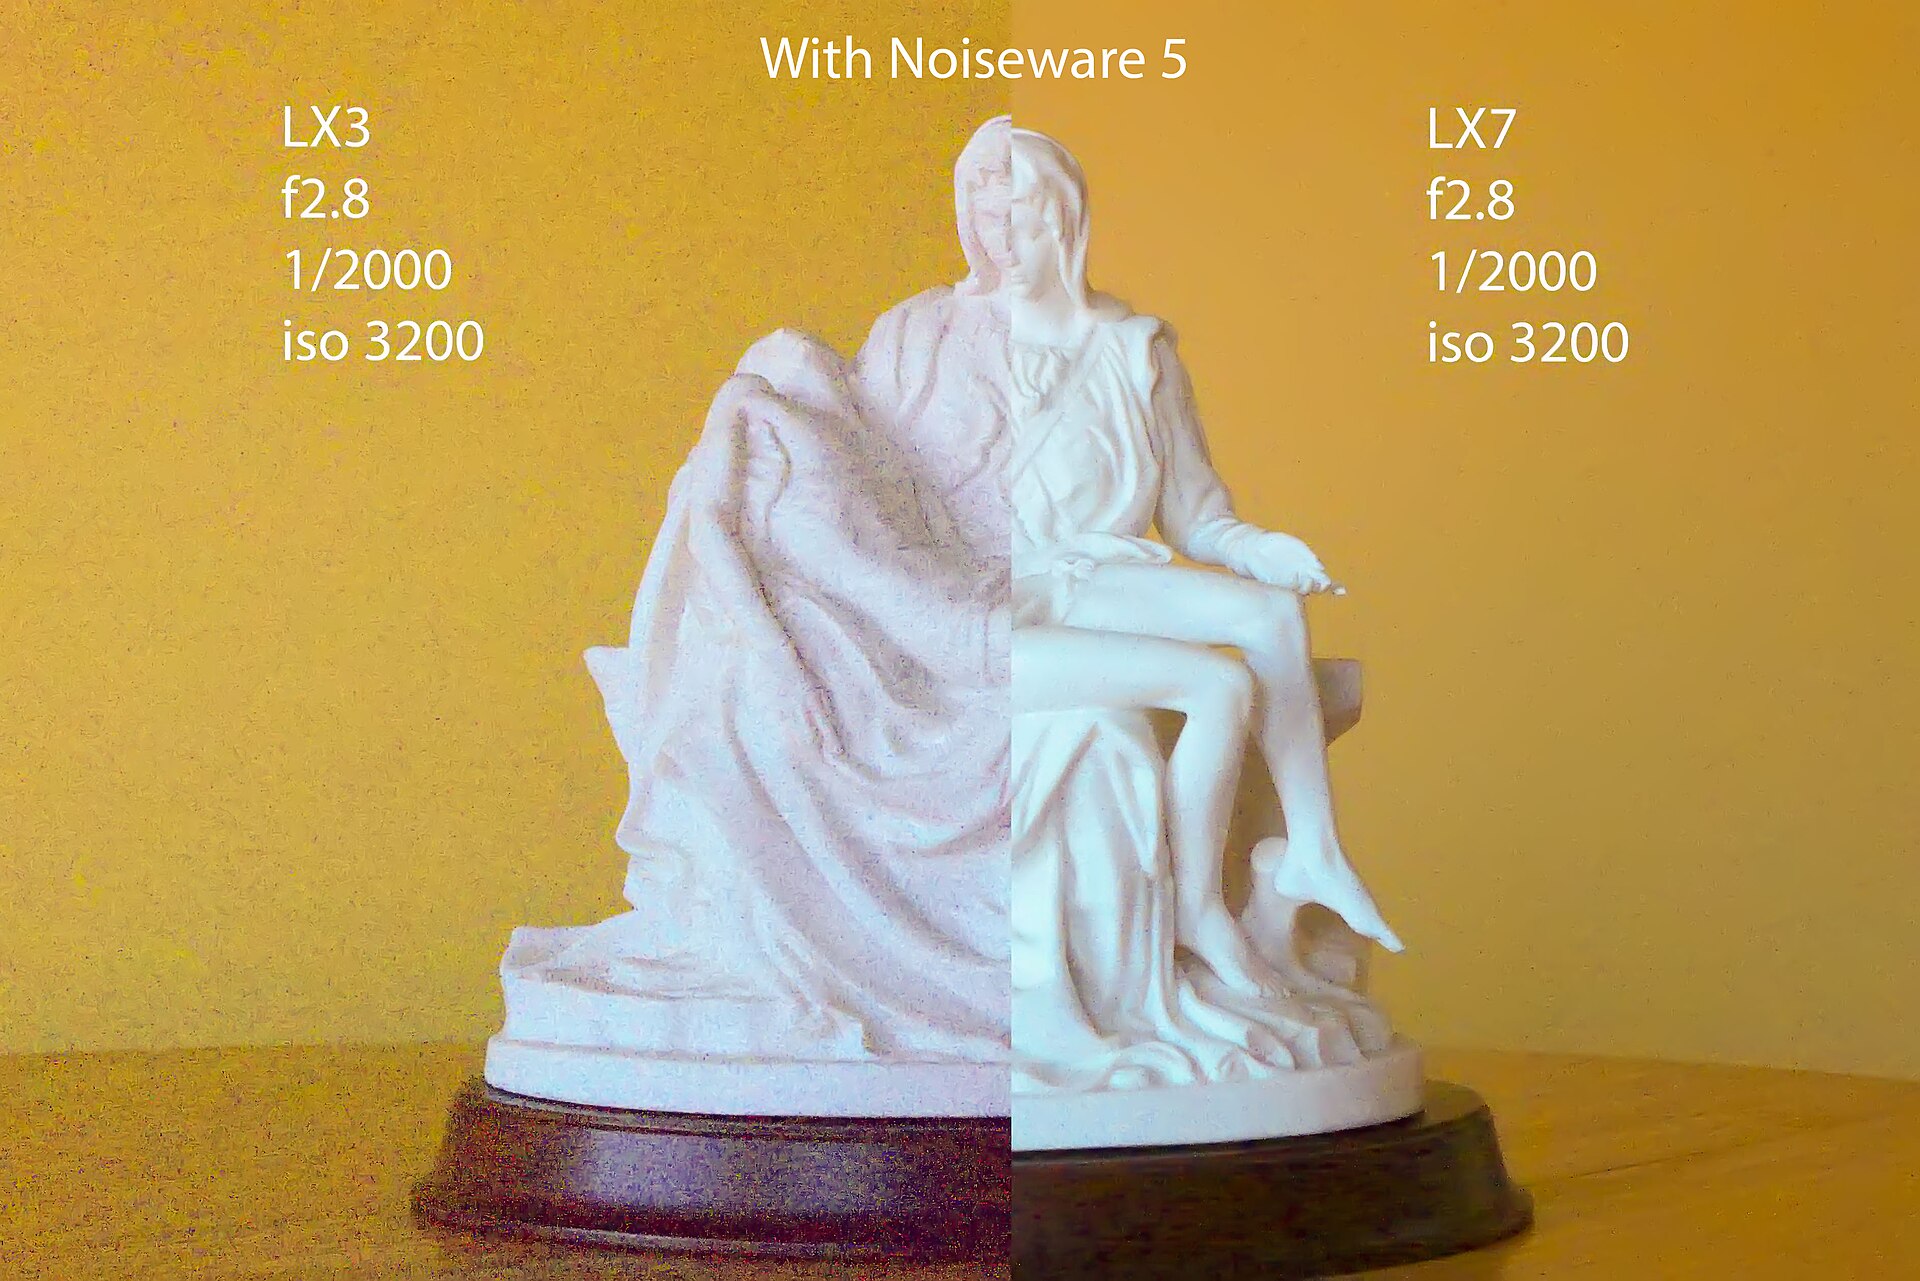
The trade-off of a higher ISO is noise — the digital equivalent of film grain. As the sensor amplifies the faint light signal, it also amplifies the random electrical signal already present on the sensor, producing speckles of color and brightness, especially in shadows. At low ISO values such as 100 or 200, images are clean and detailed; at 6400 and above, fine detail softens and grain becomes obvious.
This is why the standard advice is to keep ISO as low as possible. But it is a guideline, not a rule: modern sensors and in-camera noise reduction handle high ISO far better than they did a decade ago, and a sharp, slightly noisy photo is almost always preferable to a clean but blurry one.
When to Use Low vs. High ISO
Choose the lowest ISO that lets you achieve the shutter speed and aperture you actually need.
- Bright daylight — stick to base ISO (usually 100 or 200). There is plenty of light, so there is no reason to accept noise.
- Landscapes on a tripod — low ISO (50–200) keeps skies smooth and detail high, because the tripod lets you use slow shutter speeds without camera shake.
- Sports and wildlife — you need fast shutter speeds to freeze motion, so raising ISO (often 200–6400) is the practical way to keep the shot bright.
- Indoor events and low light — push ISO up as needed; a grainy in-focus shot beats a clean blur.
- Astrophotography — a moderate high ISO (around 800–1600) helps stars register while keeping shutter speed short enough to avoid star trails.
Auto ISO and Modern Cameras
Most cameras offer an Auto ISO mode, often paired with a minimum shutter speed you set yourself. The camera keeps ISO low and only raises it once the shutter speed would drop below your threshold — ideal for events and handheld shooting where light changes quickly. On modern sensors, don’t be afraid to let Auto ISO climb: today’s cameras produce usable images at ISO values that would have been unusable only a few years ago.
Conclusion
ISO is the exposure-triangle setting that controls your sensor’s light sensitivity — and its cost is noise. Understand that trade-off and you can make a deliberate choice in every scene: low ISO for maximum quality when light allows, higher ISO whenever it is the price of a sharp, correctly exposed image. Master ISO, and low light stops being a limitation and becomes another creative option.
FAQ
What is the best ISO for low light?
There is no single answer — it depends on your lens, subject, and whether you can stabilize the camera. A good approach is to set the widest aperture and the slowest handheld shutter speed you can manage, then raise ISO only as far as needed to get a correct exposure.
Does higher ISO always ruin image quality?
No. Higher ISO increases noise, but modern cameras suppress it well, and the right amount of sharpening or noise reduction in post-processing recovers a lot. A noisy image is often better than a blurry one, so don’t be afraid to raise ISO when you need a faster shutter speed.
Is ISO the same on film and digital?
Conceptually yes — both describe light sensitivity — but they behave differently. Film ISO is fixed per roll and higher-ISO film shows visible grain, while digital ISO is an amplification setting you can change per shot and produces electronic noise rather than grain.
Related Posts

RAW vs JPEG: Why Photographers Shoot RAW (and When JPEG Still Wins)
A photographer shooting in the field — RAW preserves every…
Focal Length and Perspective Explained: What Your Lens Really Does
What Is Focal Length? Technically, focal length is the distance…
Rule of Thirds and Leading Lines: Master the Two Most Important Composition Rules
Composition is what separates a snapshot from a photograph. A…